Documentation · Pro workflow
Run a bulk publishing plan without giving up control.
Turn an approved list of article titles into a structured WordPress publishing run. Choose the destination, category, images and publication schedule, then click Add Approved to Queue. The plan is validated in the background and the queue opens automatically.
SitePublisher AI Pro · Up to 50 titles per plan · One-step queueing with background validation
Video tutorial
Watch the Bulk Automation walkthrough
The video demonstrates the workflow. In the current Pro version, Add Approved to Queue replaces the separate Preview plan step shown in older recordings. Follow the updated written steps below.
Before you start
Prepare the destination before preparing the titles
Bulk Automation uses the saved website connection, profile and content defaults. Confirming these first prevents a complete batch from inheriting an avoidable mistake.
OpenAI is ready
Confirm that the approved OpenAI API configuration works and that the OpenAI account has sufficient billing credit for the planned text and image requests.
Review OpenAI setup →The website is connected
Test the destination in Website Manager and refresh its WordPress categories. The selected user must be allowed to create and publish posts.
Review website connection →The profile is correct
Check the website’s country, enabled languages, tone, audience, reading level and author. These values become the context for every title in the plan.
Explore Website Profiles →The title list is approved
Prepare one clear article title per line. Remove duplicates and decide whether every title belongs on the same destination, in the same category and under the same settings.
Prepare the batch ↓The content defaults fit
Review the target length, structure, headings, lists, FAQ and CTA defaults. One unsuitable default can affect every article in the approved plan.
Review initial setup →A small run comes first
For a new website, prompt, profile or schedule, begin with a few representative titles. Confirm the destination results before increasing the volume.
Review the approval boundary ↓Inside SitePublisher AI Pro
See the complete Bulk Automation workspace
Explore the full screen below. Click the image to open the original and zoom in on any field.
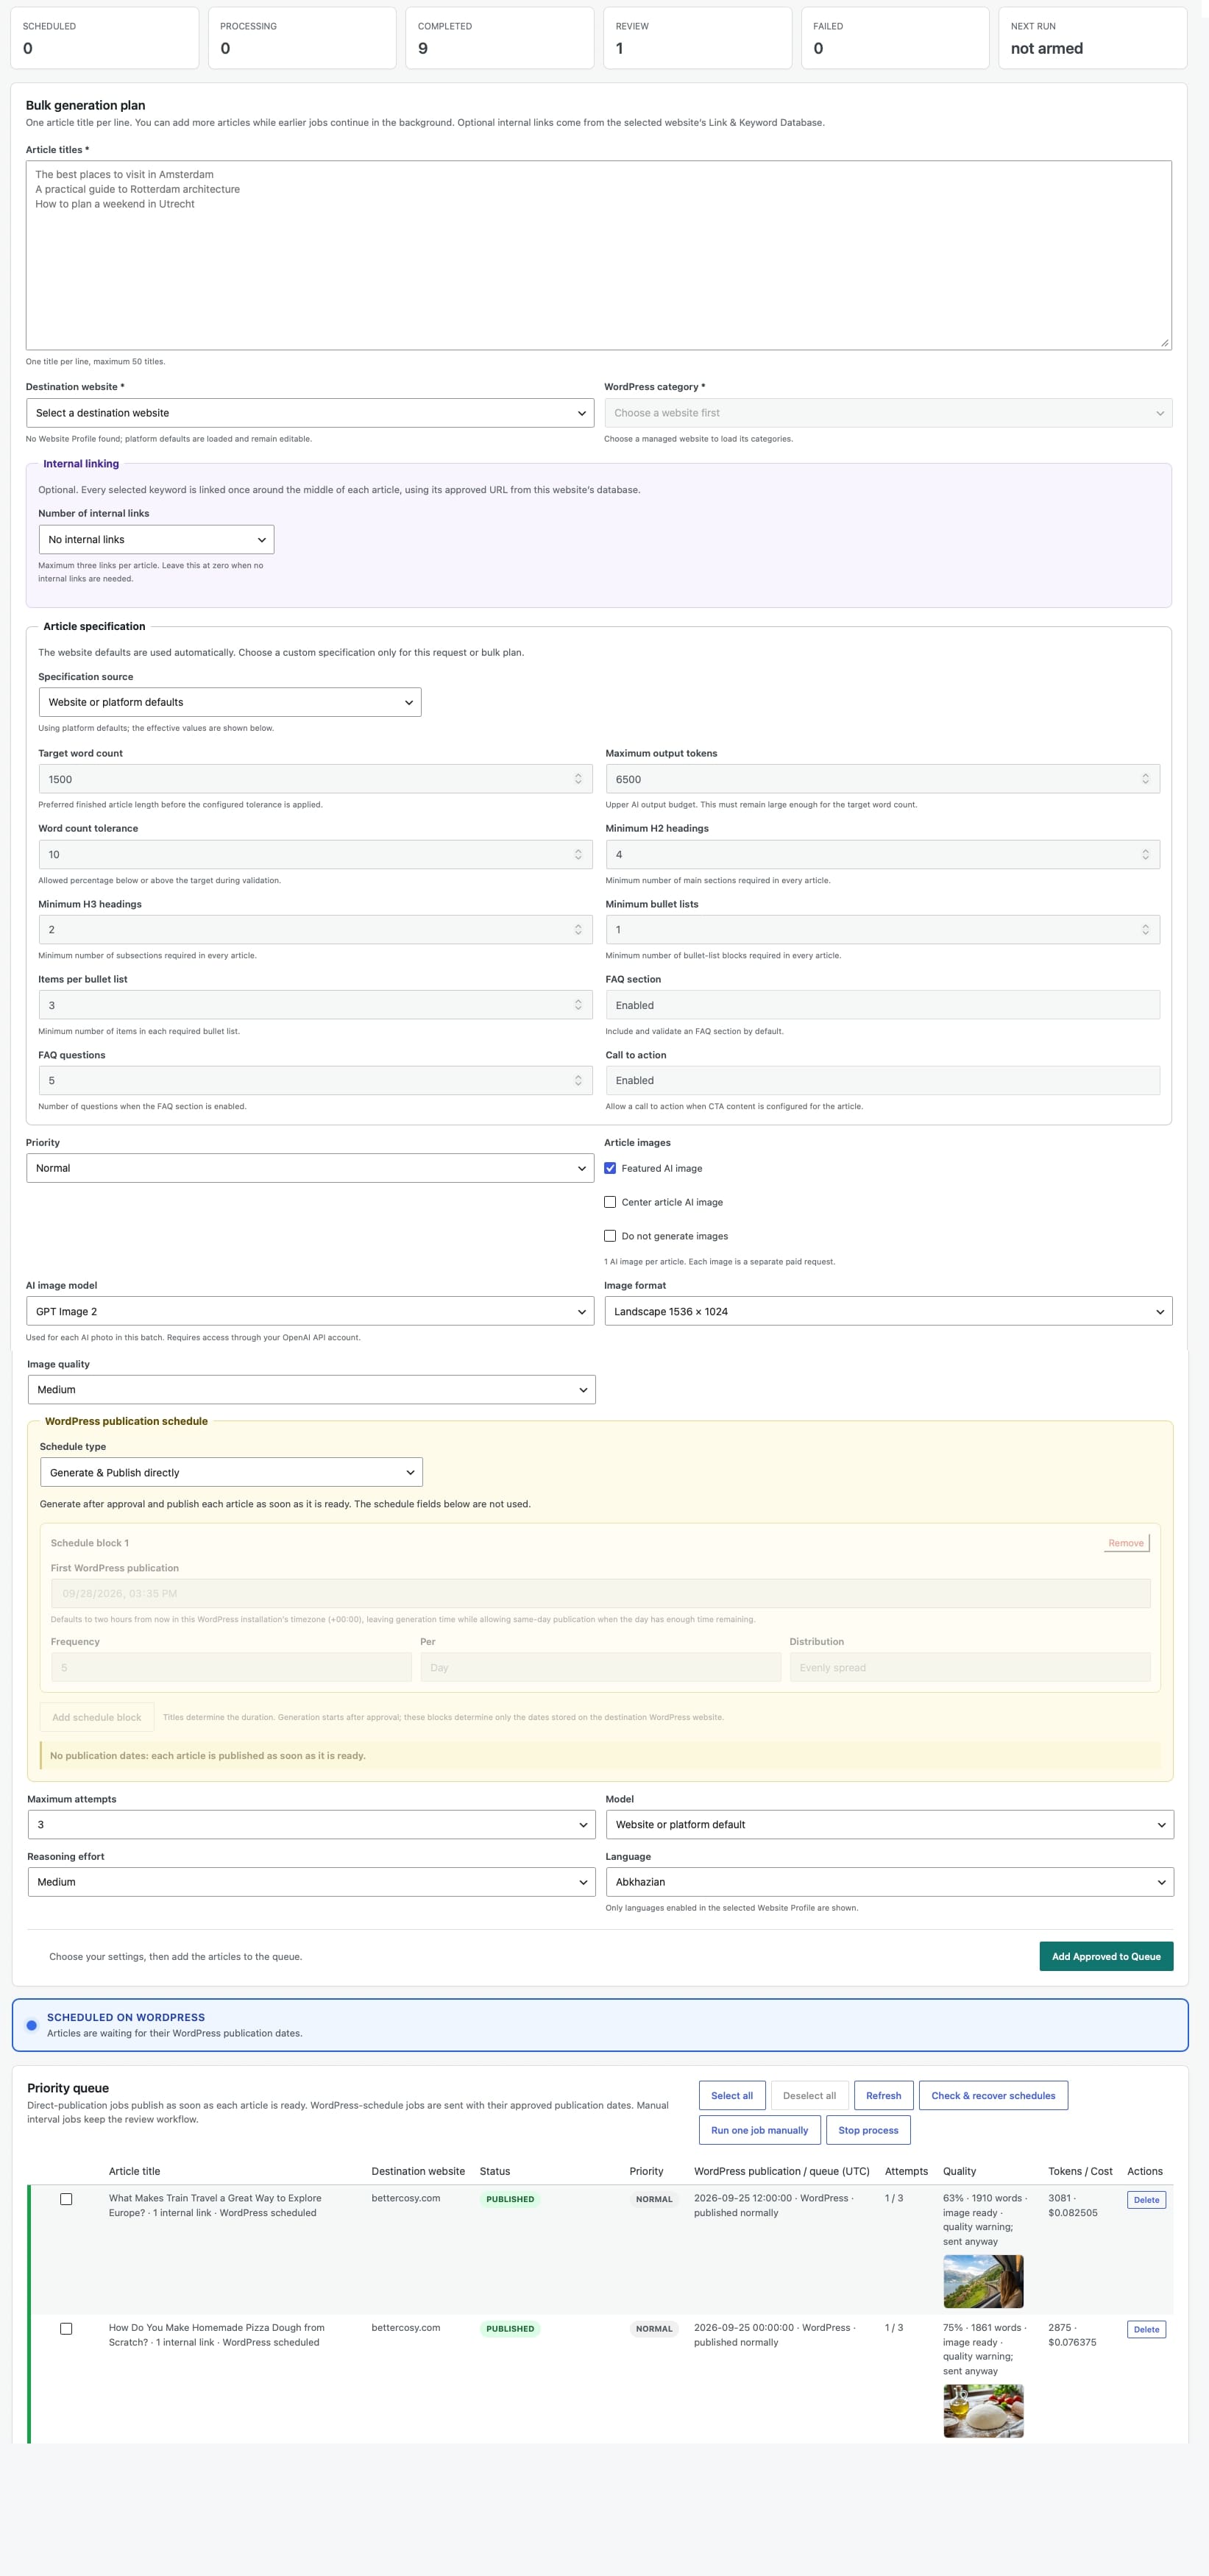
Step 1 · Bulk generation plan
Build one consistent plan for one destination
Open SitePublisher AI → Bulk Automation. The form applies the selected destination and shared settings to every title in this plan. Create another plan when a different website, category, language or content treatment is needed.
Add the article titles
Paste one title per line in Article titles. Empty lines are ignored and one plan can contain up to 50 valid titles.
Select the destination and category
Choose the Destination website, then select its required WordPress category. Local categories are read directly; remote categories come from the saved Website Manager connection.
Review the content context
The selected Website Profile supplies the country, language, tone, audience, reading level and author. Only enabled profile languages appear. Use Article specification only when this batch needs values different from the website or platform defaults.
Add optional internal links
Choose zero to three records from that website’s Link & Keyword Database. Every selected keyword is used once in every article and links to its approved URL, so select only links relevant to the entire batch.
If part of the title list needs another website, category, language, link set or image treatment, create a separate batch for that group.
Generation settings
Choose quality, order and cost before approval
Review these choices in the form before clicking Add Approved to Queue. The current values are validated and saved with the queued plan.
Featured and center article images
Featured AI image is enabled by default. Enable Center article AI image to add an image within each article. Select either or both positions, or choose Do not generate images for text only. Set the image format and quality before approving the plan. Each enabled AI image is a separate paid request.
Priority
Choose Low, Normal, High or Urgent. Priority controls which due queue job runs first; it does not change the approved WordPress publication time.
Maximum attempts
Select one to five attempts; three is the default. A failed or review item can also be reset with Retry when another attempt is appropriate.
Model and reasoning
Keep the website or platform model default, or select another available model. Reasoning effort can be Low, Medium or High and applies to every text request in the plan.
Language
Select one of the languages enabled in the destination Website Profile. The chosen language applies to every title in this plan.
AI request count
Each title needs one paid text request, plus one separate paid request for each enabled AI image. Featured and center article images together add two image requests per title. Review the number of titles and enabled image positions before queueing; actual usage appears with the results.
Step 2 · Choose a schedule type
Decide whether WordPress publication is automatic or manual
This choice changes more than timing. Read the publication boundary before approving the plan.
Generate now — schedule directly on WordPress
After you approve the plan, SitePublisher AI generates the articles immediately and creates future posts on the selected WordPress website with the approved publication dates.
- Set the first WordPress publication date and time
- Choose 1–30 articles per day, week or month
- Spread slots evenly or use a stable random distribution
- Add schedule blocks when the frequency must change later
- The schedule is calculated and validated in the background
Start and interval — manual publication
Set when the first queue job becomes due and the interval between generation jobs. Articles are generated in stages, but WordPress publication is not performed automatically.
- Choose a queue start date and time
- Use an interval from 0 to 1,440 minutes
- The first due item starts automatically after queueing
- Generated results keep the human review and publication workflow
- No future WordPress post is created by the interval alone
Planning with schedule blocks
Let the title count determine the duration
A schedule block defines a rule from its start time onward. A later block replaces the earlier rule, and the final block continues until every title has a publication slot.
Choose the first publication
The default is two hours from now in the current SitePublisher AI WordPress timezone. Every calculated WordPress publication must still be at least five minutes in the future when the plan is validated.
Set frequency and period
Choose how many articles should publish per day, week or month. Up to 30 articles can be assigned per period.
Choose the distribution
Evenly spread distributes slots through each period. Random varies the times while preserving the accepted schedule for the queued plan.
Add a later rule when needed
Use Add schedule block to change the frequency from a later date. A plan supports up to 12 unique blocks and must finish within five years.
The form uses the timezone of the WordPress installation running SitePublisher AI; check the resulting publication times in the queue. Leave enough time for the complete batch to generate. If an approved time has already passed when an article is ready, SitePublisher AI publishes that article immediately and marks the schedule as missed.
Step 3 · Add Approved to Queue
One action validates the plan and opens the queue.
The separate Preview plan button and preview table have been removed. Review the form, then use Add Approved to Queue. Required-input and schedule checks run in the background before jobs are accepted.
Check the current form
- Use up to 50 titles
- Choose the destination and category
- Check links, images and article settings
- Confirm the publication mode and dates
Add Approved to Queue
- Click Add Approved to Queue
- Correct any validation message
- The accepted plan enters the queue
- Text and enabled AI images use your OpenAI account
Watch the visible queue
- The queue becomes visible automatically
- Blue indicates active processing
- Green confirms publication
- Red indicates an error; read it before retrying
Important publication boundary
Automatic scheduling treats your approval as publication approval.
With Generate now — schedule directly on WordPress, every non-empty generated article is sent to the destination after generation. Local quality warnings or a failed optional image do not block that approved direct-publication workflow; the warnings remain visible in the queue.
Step 4 · Priority queue
Monitor generation and destination results
The queue shows each title, destination, status, priority, WordPress publication or queue time, attempts, quality outcome, token usage, estimated cost and available actions.
Read the runtime status
Running automatically means jobs are processing or waiting. Queue complete means nothing is waiting. Technical attention points to a failed or review item whose error should be checked.
Understand job statuses
Read each status label as well as its colour. Blue marks active work, green confirms publication and red identifies an error. Waiting or review states use a neutral colour. Completed generation and a confirmed WordPress publication are distinct states.
Use row actions deliberately
Cancel stops a waiting job. Retry resets a failed or review item. Delete removes the recoverable queue record but never deletes a post or media already stored on a destination website.
Use recovery controls when needed
Refresh reloads the queue. Run one job manually is an optional recovery action. Stop process prevents a new Automation job from starting; use Resume process to continue later.
An OpenAI request already in flight may finish, but SitePublisher AI will not automatically publish that result while Automation is paused.
Scheduled publication reliability
SitePublisher AI verifies that WordPress actually published
WordPress scheduling remains the destination’s responsibility, but Pro adds protection against lost or delayed future-post events.
Serialized writes and a central watchdog
Final post writes to the same destination are handled one at a time. Ten minutes after an approved publication time, the watchdog checks the actual post status and can publish a post that is still overdue and still marked as future.
- Scheduled and published results remain visible in the queue
- Delayed future posts can be recovered automatically
- Failed checks retry at controlled intervals
- Manually changed status or a later date remains untouched
Check & recover schedules
Use this queue control when you want an immediate check of eligible overdue schedules. It never publishes before the approved time plus the ten-minute grace period.
- Published normally confirms WordPress completed it
- Recovered after missed schedule confirms safe recovery
- Still scheduled will be checked again
- Changed on WordPress; untouched respects your edit
Troubleshooting
Use the queue message before repeating an action
A duplicate publication is harder to correct than a delayed queue record. Check the destination whenever SitePublisher AI says a remote write may already have succeeded.
Check the required inputs
- Use 1–50 non-empty titles
- Select a destination and available category
- Complete every enabled internal-link slot
- Keep every automatic publication at least five minutes ahead
- Increase the final schedule frequency if the plan exceeds five years
Check configuration and runtime
- Confirm the OpenAI configuration and account billing
- Look for Stopped and resume only when ready
- Refresh the queue and read the exact item error
- Use Retry for a failed or review item when appropriate
- Use Run one job manually only as a recovery control
Verify WordPress scheduling
- Compare the intended time with the queue’s publication time
- Click Check & recover schedules after the grace period
- Check destination Site Health for late events or loopback errors
- Use a reliable server cron for time-sensitive publishing
- Do not resend an article that already exists on the destination
Bulk Automation FAQ
Questions to settle before a large run
Start with a small representative batch when using a new destination, profile, prompt or schedule for the first time.
Can I combine several destination websites in one plan?
No. One bulk plan uses one destination website and one WordPress category. Create a separate plan for every destination or materially different content group. Earlier approved jobs can continue in the background while you prepare the next plan.
Do I still need to click Preview plan?
No. Click Add Approved to Queue after checking the form. Validation runs in the background, then the accepted jobs enter the queue and paid OpenAI processing can begin.
How many OpenAI requests will the batch use?
Each title creates one text request. Add one image request for Featured AI image and one for Center article AI image when selected. Do not generate images removes both image requests. Review the chosen image positions before queueing; actual token and cost information appears in the queue.
Can I review every article before it reaches WordPress?
Yes—choose Start and interval — manual publication. The default direct WordPress schedule is approval-bound automation: approving the plan also approves the generated non-empty results for delivery to WordPress, even when a local quality or optional-image warning is recorded.
Can I stop an approved plan?
Use Stop process. No new Automation article starts, and an in-flight generation result is not automatically published. Resume only when you want the remaining jobs to continue. You can also cancel individual jobs that are still scheduled.
What happens if I delete a queue record?
The recoverable SitePublisher AI queue record is removed. A post or media file already stored on the destination WordPress website is not deleted, so always check the destination first.
Continue with scheduling
Plan the publishing rhythm before scaling the volume.
The next guide explains publication timing, WordPress timezones, schedule blocks and the reliability checks behind delayed-post recovery.