Documentation · Creating a single article
Create one article with control at every step.
Turn a focused brief into a complete WordPress article, let SitePublisher AI prepare it in a private work queue, and review everything before saving or publishing. With Pro, edit the generated text and links directly and add a center article image alongside the featured image.
Available in Free and Pro · OpenAI API usage is billed separately through your own account
Video tutorial
Watch the Single Article walkthrough
Follow along with the video, then use the written guide below as your reference.
Before you begin
Start with the essentials already in place
A few minutes of preparation gives the model clearer direction and makes the final human review faster.
Connect OpenAI
Complete the OpenAI API configuration and run the preview before saving the key. The article button requires an available API connection.
Configure OpenAI →Save your website profile
Set the country, languages, tone, audience, reading level and author once. These values become useful defaults for every new article.
Review initial setup →Prepare your editorial input
Choose a clear topic, one primary keyword and a WordPress category. Add trusted facts or source notes when accuracy depends on specific information.
See every brief field →Inside SitePublisher AI Pro
See the complete Single Article workspace
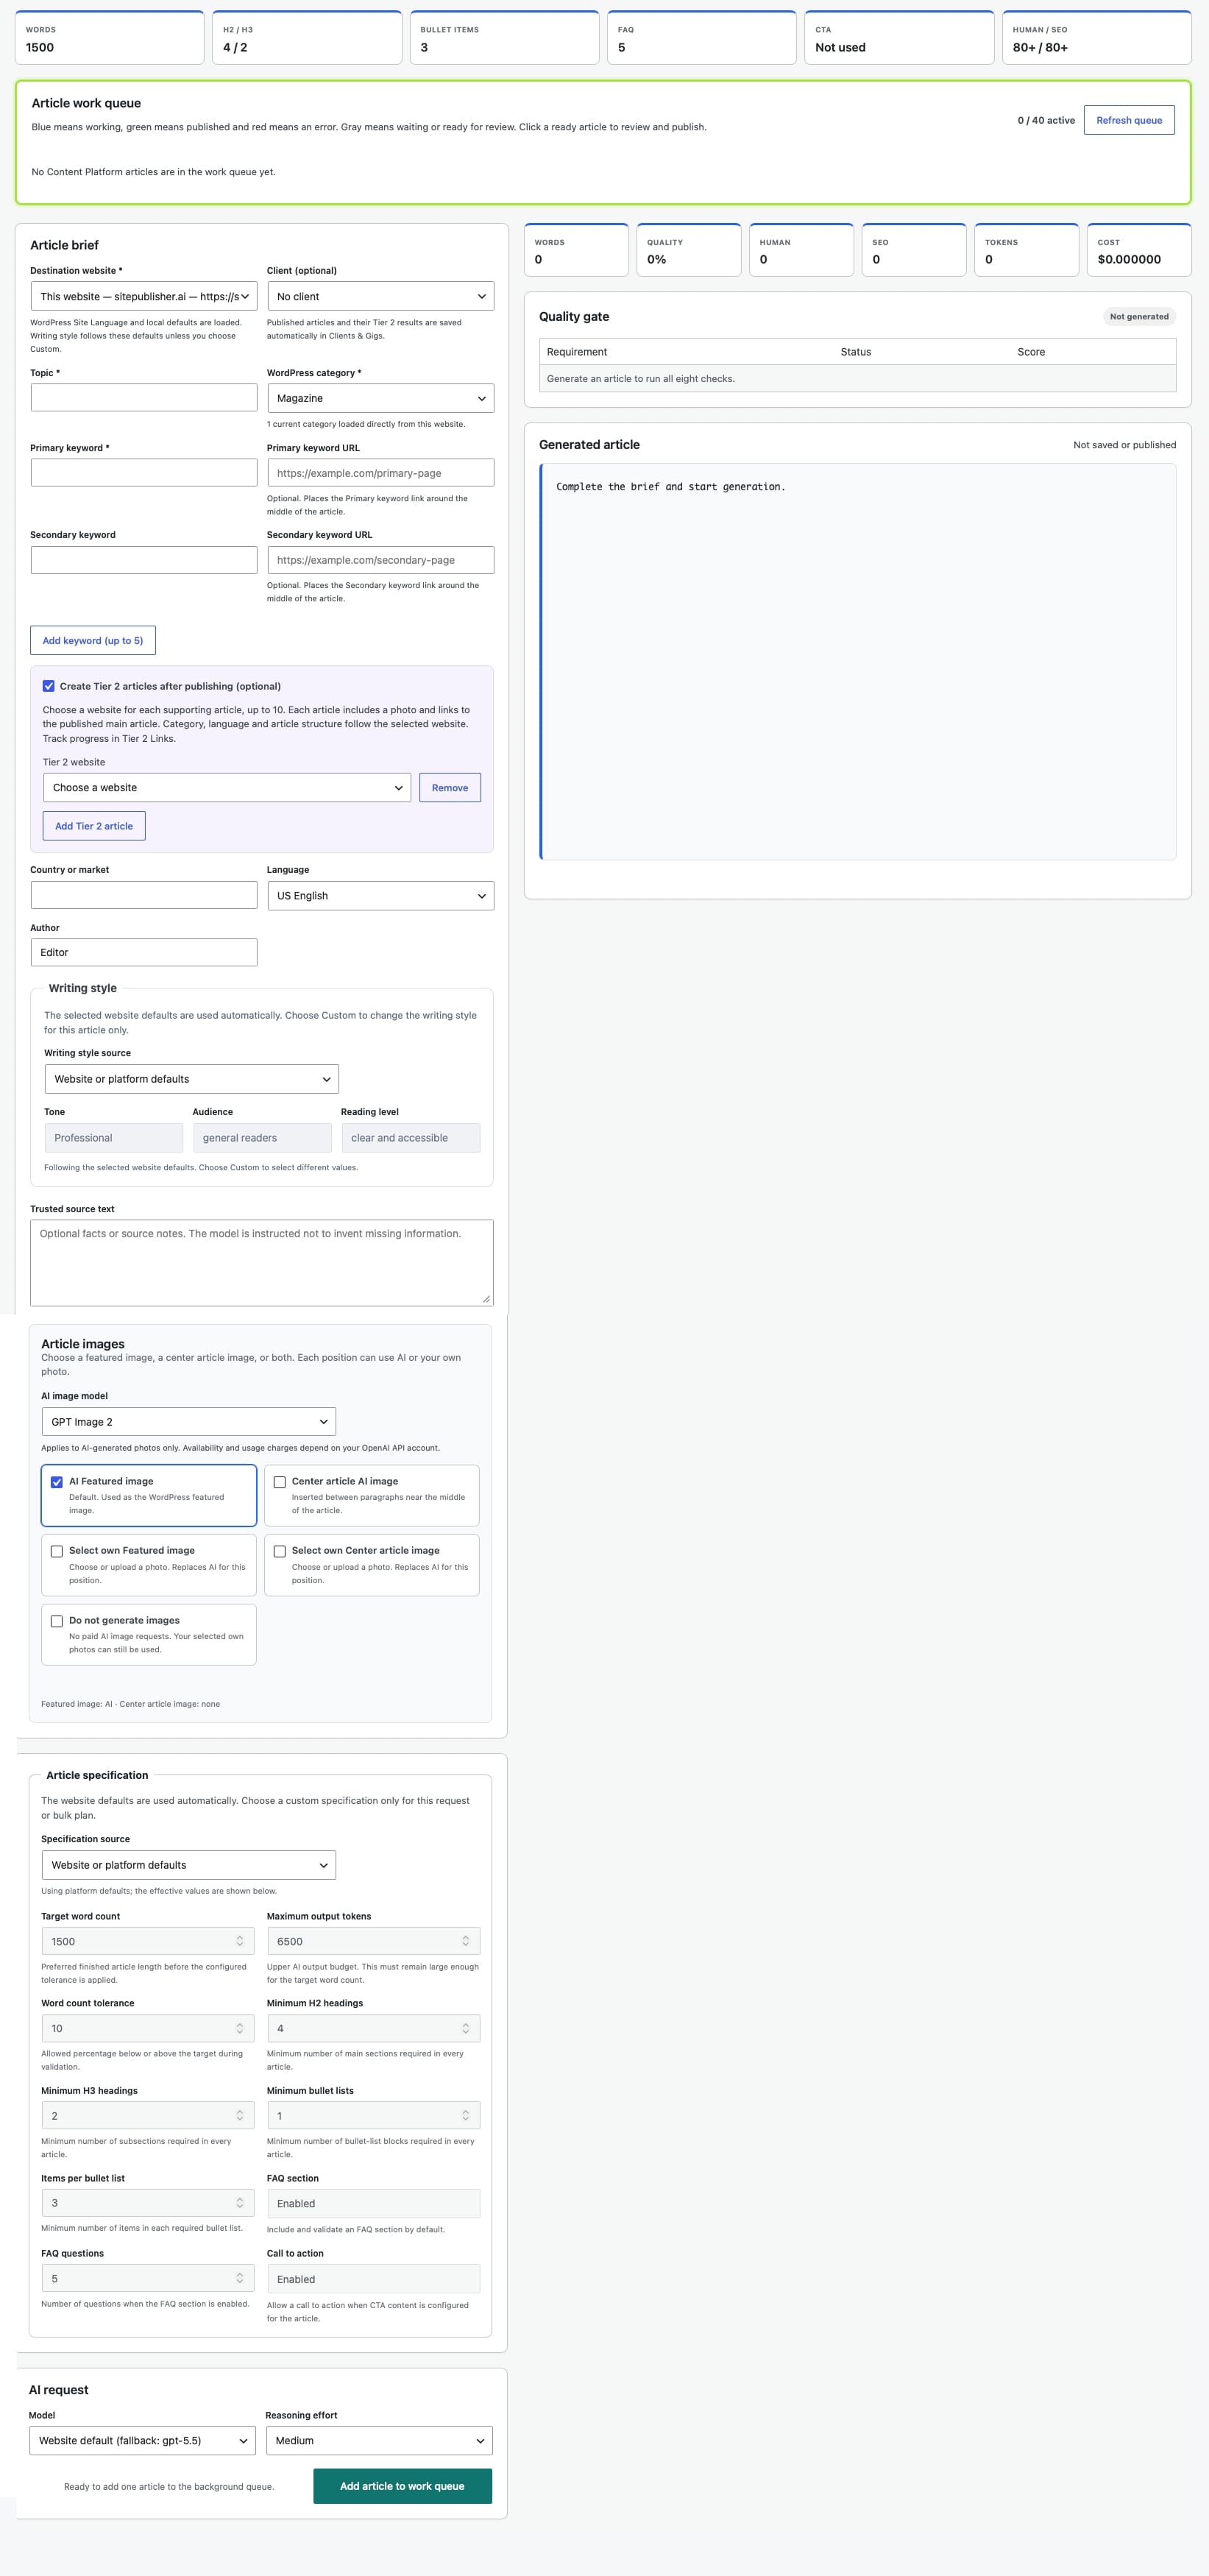
Explore the full screen below. Click the image to open the original and zoom in on any field.
Step 1 · Article brief
Give the article a clear destination and purpose
Open SitePublisher AI → Single Article. “This website” is selected automatically in Free; Pro can also choose a connected destination website.
Destination and category
Confirm the destination website and required WordPress category. In Pro, select an optional Client beside Destination website before generating. Leave it empty when no client is needed.
Topic and primary keyword
Describe one focused subject and enter the main search phrase. Specific input produces a more coherent article than a broad, multi-topic request.
Keyword links
Primary and secondary keyword URLs are optional. In Pro, click Add keyword (up to 5) to add one extra pair at a time, up to five in total. Supplied keyword links are placed contextually around the middle of the article.
Country, language and tone
Country and language follow the selected profile. In Pro, Tone, Audience and Reading level use dropdowns. Keep Website or platform defaults to use the saved values; select Custom for this article to enable the controls.
Audience, reading level and author
Choose the audience and reading level under Custom for this article when needed. These overrides apply only to this article and do not change Website Settings. Confirm the WordPress author separately.
Trusted source text
Add verified facts, product details or source notes that must guide the article. Missing information should not be invented; include what the model genuinely needs.
Optional · Pro only
Create supporting articles after the main article is published.
Check Create Tier 2 articles after publishing (optional). Select a website for each supporting article and use Add Tier 2 article to add more, up to ten. Complete every destination before queueing.
Review and publish the main article first. Saving a draft does not start Tier 2. After successful publication, the supporting jobs generate new titles, text, an AI featured image and links to the confirmed main URL. Category, language and structure follow each selected website. Track progress in Tier 2 Links.
If you selected a client, published main and supporting articles are recorded under that client. In Clients & Gigs, export one row or selected results, including all keyword and URL pairs.
Featured image
Choose AI generation or your own photo
The image choice is part of the brief. SitePublisher AI prepares the selected image route after the article text is ready.
Selecting an existing Media Library photo avoids that image-generation request. Text generation still uses your OpenAI API account.
Generate AI photo — default
SitePublisher AI generates a relevant featured image automatically after the article text. Review the image before publication just as carefully as the copy.
Select own photo
Choose or upload a photo through the current WordPress Media Library. The selected image is attached to the article workflow instead of generating a new AI image.
Pro: center article image or no AI images
AI Featured image is enabled by default. Enable Center article AI image for an additional image within the article, or use Select own Center article image. You can also use Select own Featured image. Each position can use AI or your own photo. Do not generate images disables AI images while preserving your selected photos. Complete any own-photo selection before queueing the article.
Generation controls
Use the defaults or tune this article
The stored content specification and AI settings are loaded for you. Change them only when the article needs a different structure, length or reasoning level.
Structure and length
Review the target word count, tolerance, headings, bullet requirements, FAQ settings and related quality thresholds. These values define the expected article contract.
- Keep the standard contract for consistent output
- Adjust only the fields this article genuinely requires
- Quality checks compare the result with this specification
Model and reasoning effort
Use the website default model or select another available model. Reasoning effort offers Low, Medium and High; Medium is the default balance.
- Higher settings can use more tokens and increase cost
- Model availability depends on your OpenAI account
- Every queued article is a billable API request
Step 2 · Article work queue
Add the brief and let the background workflow run
Select Add article to work queue. The form clears immediately and “This website” becomes the local default again, ready for another brief.
It starts paid OpenAI processing, but no WordPress post is saved or published until you open the result and explicitly confirm a write action.
Waiting and generating
The queue first records the brief and then generates the article text. You can keep working elsewhere while background processing continues.
Text and image ready
The status shows whether the text and selected images are ready for review. Pro uses blue for active work, green for published articles and red for errors, matching Tier 2 Links and Bulk Automation.
Refresh and recovery
The visible queue refreshes automatically about every eight seconds. Use Refresh queue when needed; failed items can be retried and waiting items can be cancelled.
Active-job limit
You can have up to 40 active or waiting jobs. Finish, cancel or remove old queue records before adding more when the limit is reached.
Step 3 · Human review
Open the completed result and inspect the final article
Select the ready queue item to load the article. A successful automated score is helpful, but it never replaces an editorial review.
Load the result
The workflow opens the generated article together with its destination, category, source and editable article title.
Read the quality signals
Review Words, Quality, Human, SEO, Tokens and Cost plus the eight automated quality checks. “Quality passed · review” still means human review is required.
Review and edit the article in Pro
Open the ready queue item to load Generated article. With Pro, edit the text directly in this window, use bold formatting, and add, change or remove links. Review your changes, the featured image and any center article image, then choose Save as draft or Publish now. Check facts and resolve anything marked “Review required” before continuing.
Save, image and publication
Choose the WordPress action only after review
The review panel keeps content generation separate from WordPress writing. Each save or publication request first creates a non-writing preview and then asks for explicit confirmation.
Save as draft
- Preview the planned destination write
- Confirm only when the destination and category are correct
- Continue editing the draft in WordPress if needed
Publish now
- Publishes only after your confirmation
- Returns the final public article URL
- Publishing a saved draft updates the same post
Generate featured image
- Review or edit the image prompt first
- Choose landscape, square or portrait format
- Confirm the separate paid image request
Troubleshooting
Use the visible status before trying again
The queue is designed to show where a request stopped. Keep the original brief available until the result has been reviewed and safely stored.
The queue button is unavailable
Return to OpenAI API configuration, verify the stored key and run the preview again. Then reload Single Article.
The required category is missing
Create or verify the category on the destination WordPress website, refresh the profile data and then reopen the brief.
A queue item failed
Read the displayed non-sensitive error, correct the relevant input or connection and use Retry. Avoid repeatedly submitting identical briefs.
The featured image needs attention
Review the image prompt and generate it separately, or start a new brief with an appropriate Media Library photo selected.
Frequently asked questions
Single Article answers
The key distinction is simple: generation happens in the private work queue; publication remains your decision.
Is an article published automatically?
No. Adding a brief starts generation only. You must open the completed result, review it and explicitly confirm Save as draft or Publish now.
Can I queue several articles?
Yes. You can add new briefs while background work continues, up to 40 active or waiting jobs.
Can I change the Website Profile values for one article?
Yes. In Pro, choose Custom for this article to enable the Tone, Audience and Reading level dropdowns. Website or platform defaults keeps those controls grey and uses the saved profile values. Article overrides do not change Website Settings.
Does adding an article incur OpenAI costs?
Yes. Text generation uses your own OpenAI API account. Every enabled AI image adds a separate paid image request. In Pro, enabling both the featured and center article AI images adds two image requests. Your own selected photos use no AI image requests.
What happens after I save a draft?
The WordPress post ID is retained. If you later choose Publish now from the same loaded result, SitePublisher AI updates that draft instead of creating a duplicate post.
Next guide
Ready to understand every publication option?
Continue with Publishing articles for the complete draft, publication and destination workflow, or return to the documentation overview.